Delay block
Use the Delay block when customers in a journey should continue to the next engagement step later rather than immediately. Each customer waits at the Delay for the period you set, then carries on - for example, welcome a customer, wait seven days, then invite them to a challenge. The whole journey stays together on one canvas.
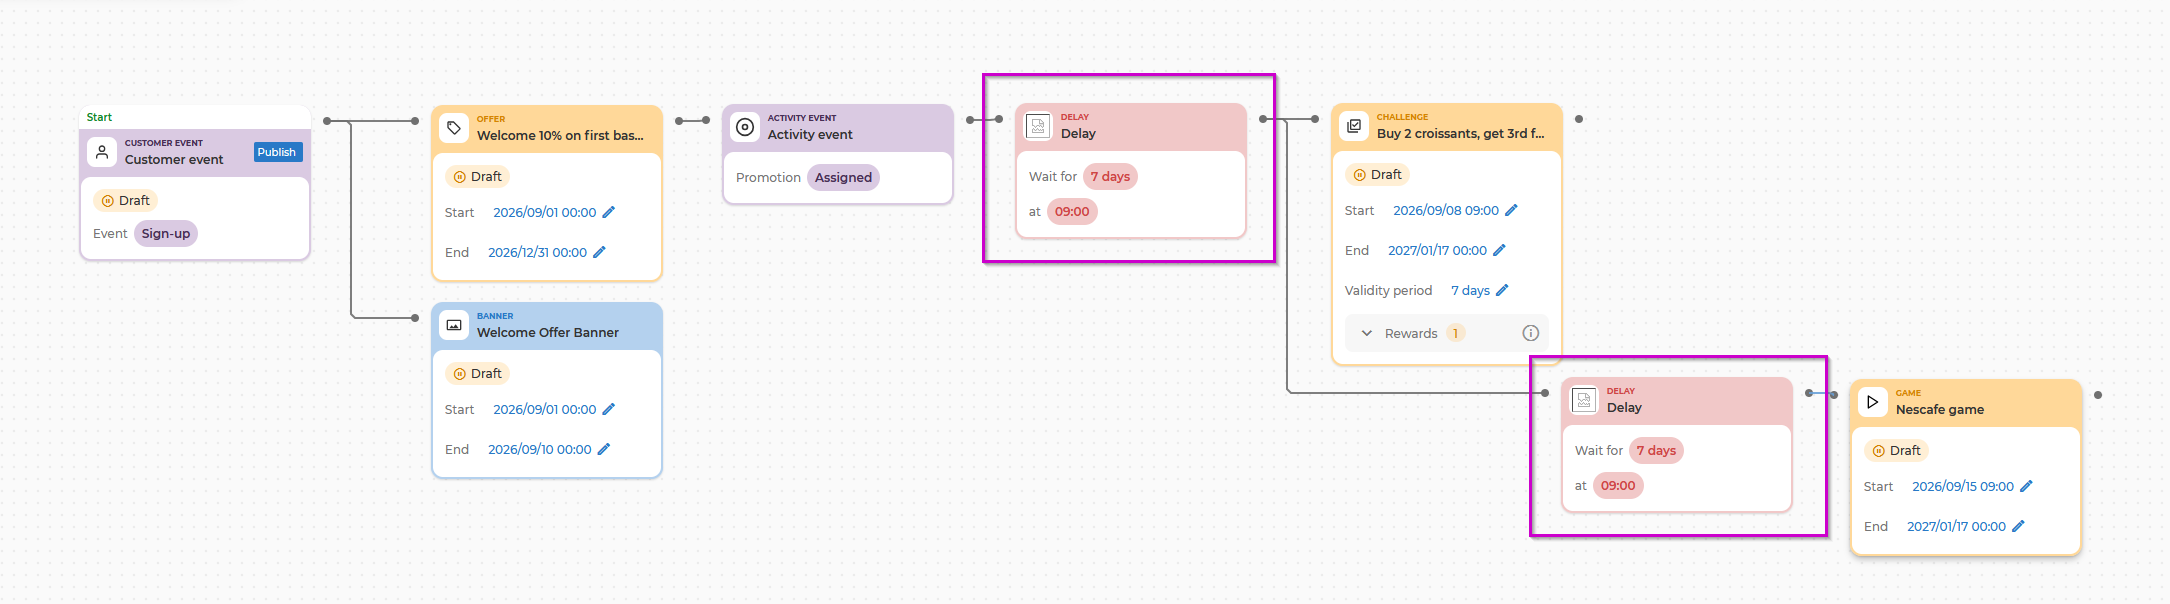
When to use a Delay
- Build a customer journey spanning many days without creating separate campaigns.
- Space out messages and activities so customers are not engaged too close together.
- Follow up later instead of instantly after a customer completes a challenge, receives an offer or takes another action.
- Reach customers at a better time of day, such as sending an evening message instead of contacting them early in the morning.
Configure a Delay
The Delay form lets you set how long customers wait in one sentence:
At this step, wait for
[Number][Unit], then continue at[time].
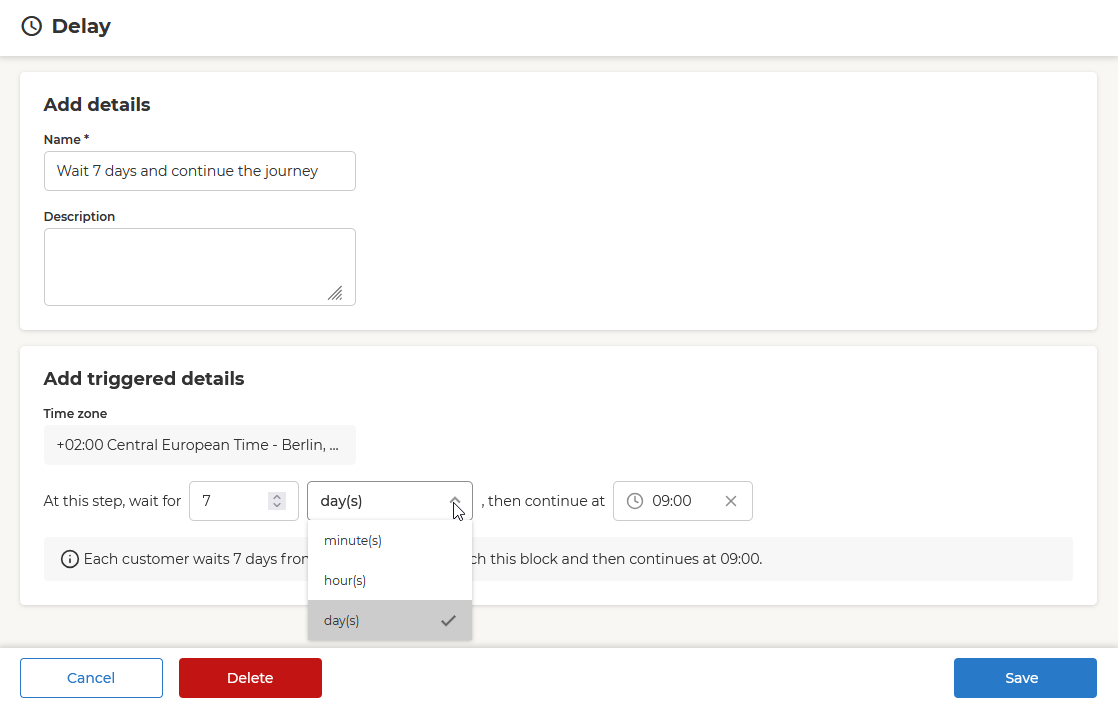
| Unit | Value | Time of day |
|---|---|---|
| Minutes | 1 or more | Not used |
| Hours | 1 or more | Not used |
| Days | 0 or more | Required |
The maximum Delay is 90 days. The same limit applies when you choose hours or minutes: 2160 hours or 129600 minutes.
A Delay is relative: its timer starts when each customer reaches it, rather than on one fixed date. How the wait is measured depends on the unit you choose.
Minutes and hours measure elapsed time, so every customer waits exactly as long as the next. A customer who reaches a 24-hour Delay at 14:05 continues at 14:05 the next day.
Days counts calendar days, and you set the time of day customers continue at. Everyone then continues at the same moment, but the wait itself depends on when they arrived. With a Delay of 1 day and continue at 09:00:
| Customer reaches the Delay | Continues | Actual wait |
|---|---|---|
| 08:00 | next day at 09:00 | 25 hours |
| 17:00 | next day at 09:00 | 16 hours |
| 23:30 | next day at 09:00 | 9 hours 30 minutes |
Use 0 days to continue later today
Set 0 days with a time of day when you want customers to continue later on the same day. Customers arriving before that time wait until it; customers arriving after it continue immediately.
Time zone
The timezone in your own computer's local time zone - it is shown next to the field and saved with the Delay, so 09:00 stays 09:00 through daylight-saving changes.
Add a Delay to a flow
You can place a Delay after a trigger, such as a customer event, activity event or Inbound API event, or after a segmentation step. After the Delay you can connect an activity or another Delay.
You cannot place a Delay between two segmentation steps or directly after an activity. To respond to what happened in an activity, add an Event block first and place the Delay after that.
- Open your campaign in Orchestration view.
- Drag Delay from the Controls group onto the canvas.
- Connect it between the step customers come from and the activity they should reach next.
- Add a Name and, if useful, a Description.
- Choose the Number and Unit. For Days, also choose when customers should continue at.
- Review the summary and save.
A Delay is active as soon as it is saved. It has no separate Draft or Published state, so saved changes take effect immediately.
What happens while customers are in a Delay
Customers continue in the flow when their waiting time in the Delay block ends. At the time they continue, they'll progress in the flow to whatever the next step is at that point in time - e.g. if next activity was changed, they will continue there.
Count and Simulation runs do not showcase anything for the Delay block
The Delay does not show a live number of customers currently in it. A snapshot count may appear when you change the Delay or remove it.
Change a Delay while a campaign is running
You can change the Delay timing while the campaign is running:
- Extending the Delay will keep the customers who are waiting currently in the waiting stage for more time.
- Shortening the Delay will release forward in the flow the customers who are waiting currently whose new timing has already passed. Confirm the change after reviewing the number of customers affected.
Remove a Delay while a campaign is running
Before removing a Delay, set the block immediately before it back to Draft. This stops new customers from reaching the Delay block that is about to be removed.
When the Delay is removed, the canvas reconnects the flow so customers can continue without it. If customers are in the Delay, choose one of these options: - Delete block, send customers forward - customers continue to the next part of the flow immediately. - Delete block, remove customers from flow - customers leave the flow and do not continue.
If the next activity is in Draft, sending customers forward may cause them to leave the flow because a Draft activity cannot receive them.
Good to know
- A Delay cannot be paused. It is active whenever it is on the canvas, and saved changes take effect immediately.
- If the next activity is set back to Draft or deleted while customers are in a Delay, when the customers move out of the Delay and further into the flow, they will leave the flow cannot currently be added back.