Outbound API block
The Outbound API block connects your campaigns to external systems in real time. When a customer reaches this step, Nexus notifies your CRM, CDP, or any other tool — so their journey continues beyond the platform.
What can I do with Outbound API?
You can use the Outbound API block to trigger actions in external systems based on real time customer behaviour in your campaigns.
Examples
- When a customer signs up, notify your CRM to trigger a welcome email.
- When a customer completes a challenge, send their data to your CDP for a follow-up journey.
- When a customer activates an offer, update their profile in an external system.
What this enables
- Trigger external systems in real time based on customer events.
- Send selected customer or event data for personalisation or profile updates.
- Connect campaign journeys with external communication platforms.
A simple flow example
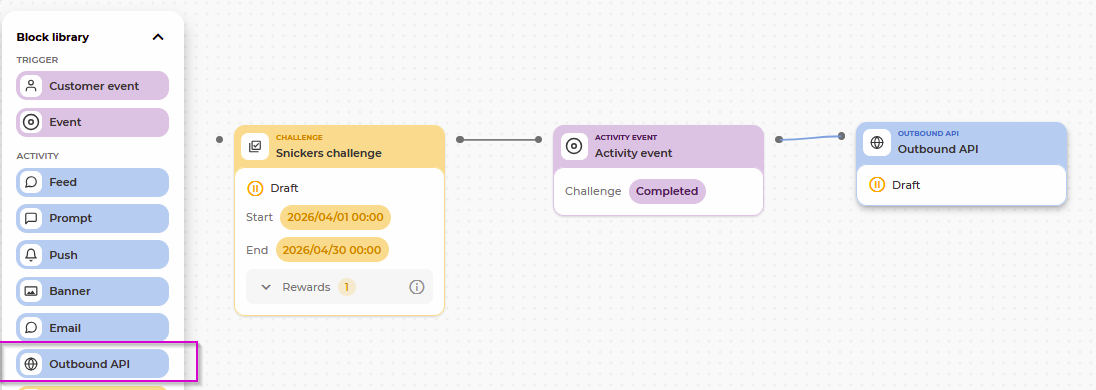
Challenge → Challenge completed → Outbound API → CDP
How to use Outbound API in a campaign
Step 1: Add the Outbound API block
- Open your campaign in Orchestration view.
- Drag the Outbound API block from the toolbox onto the canvas.
- Connect it after an event block to define when it should trigger.
Step 2: Configure the block
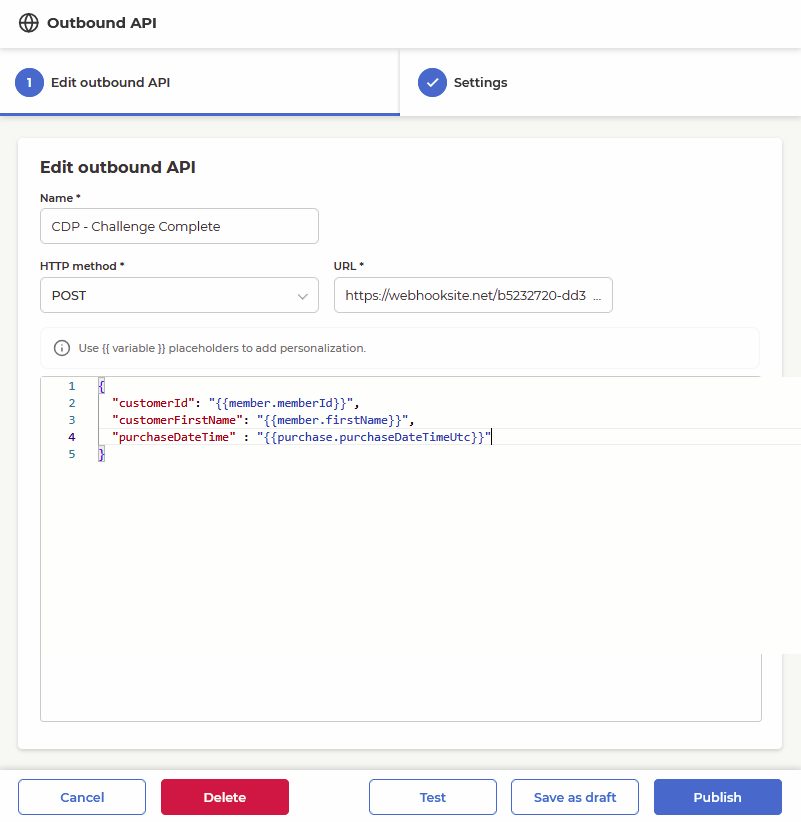
Fill in the following fields:
- Name: A label for the block visible on the canvas. Choose something descriptive (e.g.
CDP - Challenge Complete). - Endpoint: The HTTP method and destination URL of the external system. If unsure, align with your IT team.
- Body (Payload): The data to send to the external system in JSON format. You can insert dynamic values using placeholders. See Using placeholders.
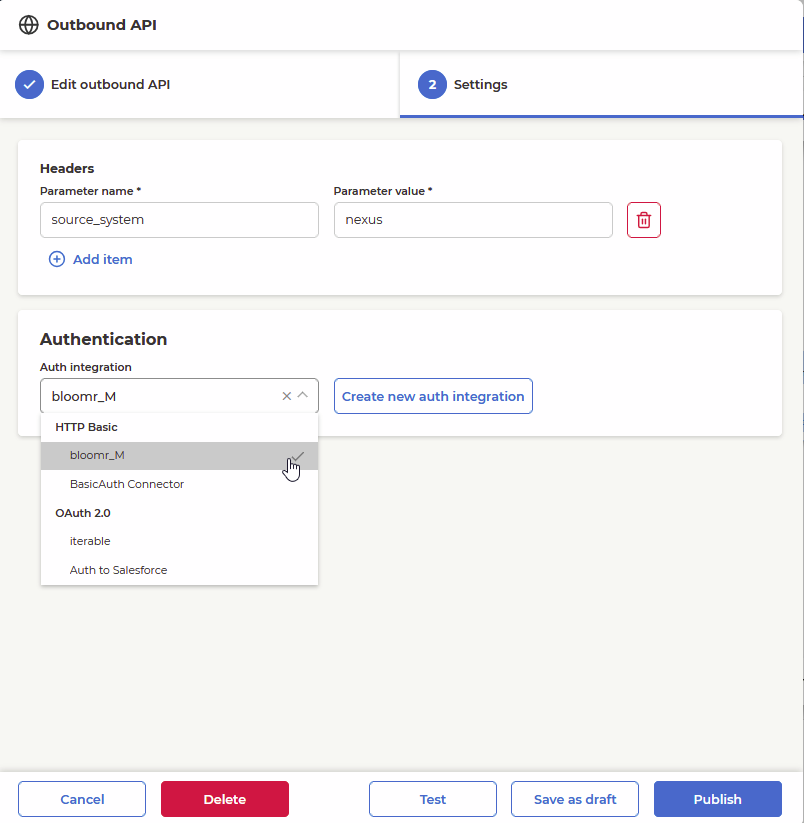
- Authentication: Select a saved Authentication to handle credentials automatically. If none exists, you can enter credentials directly or ask your IT team to create one. See Authentication.
- Headers (optional): Key-value pairs sent alongside the request.
Step 3: Test
Use the Test button to validate your setup before running the campaign. It sends a single request using the current configuration and shows you:
- The response status (e.g. 200 OK, 401 Unauthorized).
- The response body returned by the external system, in case of error status.
Step 4: Save and launch
Publish the Outbound API block, it becomes active and will execute when next event reaches it in the campaign.
Using placeholders
Placeholders let you insert dynamic data into the Body of your request. They use double curly braces:
{{ placeholder.name }}
Example:
{
  "customerId": "{{event.memberId}}",
  "store": "{{purchase.storeId}}",
  "memberEmail": "{{member.email}}"
}
Autocomplete
Type {{ in the Body field to open a dropdown with available placeholders for your campaign's event type.
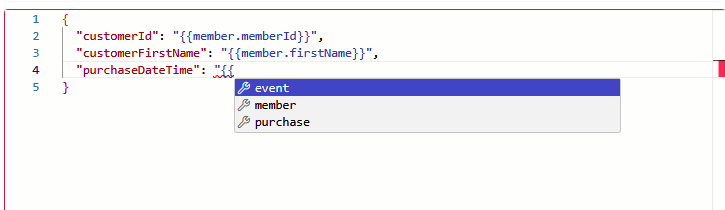
Available data sources
- event.* — data from the event that triggered this campaign run (e.g.
{{ event.memberId }},{{ event.receiptId }}). - member.* — information about the customer, fetched automatically (e.g.
{{ member.firstName }},{{ member.metadata.externalContactId }}). - purchase.* — details of the purchase linked to the event (e.g.
{{ purchase.storeId }},{{ purchase.purchaseTimeUtc }}). Available when the triggering event is related to a purchase, e.g. a Challenge will expose the last purchase that completed that Challenge.
Authentication
If the external system requires authentication, you can reuse a saved Authentication. Authentications store credentials centrally so they can be reused across multiple blocks and campaigns.
Authentication is typically set up once by your IT team and then selected by marketeers from a dropdown.
For more information, see Integrations.
Limitations
- The Outbound API block sends data one-way (Nexus → external system). It does not receive or act on responses.
- The block can only be triggered by real-time events. It cannot be used in segmentation-based flows that generate a list of customers for batch processing, and it is skipped during a Count runs.
- Retry handling is built in. No additional configuration is required.
Good practices
- Align with your receiving system (CRM/CDP) to confirm the expected payload format.
- Use clear naming conventions for your blocks (e.g.
CDP_Challenge_Completion). - Start with simple use cases before scaling to complex flows.
- Test in Pre-production before enabling in Production.